[Prestashop help] How to manual Install a PrestaShop theme with FTP or Hosting account?
Prestashop allow install a Prestashop theme by 2 ways:
- Install a prestashop theme from Backoffice: Go to Backoffice > Design > Theme & Logo, click Upload a theme button for upload your module that is formatted to a *.zip file, then install it.
- Upload your prestashop theme through a FTP or Hosting account, then go to Backoffice > Design > Theme & Logo, and install it.
In this post, Buy-Addons Team will take you how to install a prestashop theme with FTP account or hosting account.
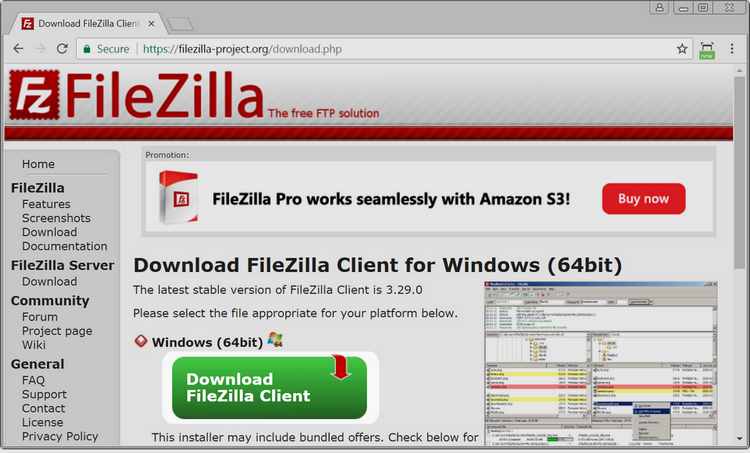
Step 1: Download & Install a FTP software for client, for an example we are using FileZilla Client software that you can download it at here: https://filezilla-project.org/download.php?type=client
Also you can use other FTP softwares as WinSCP, CuteFTP…
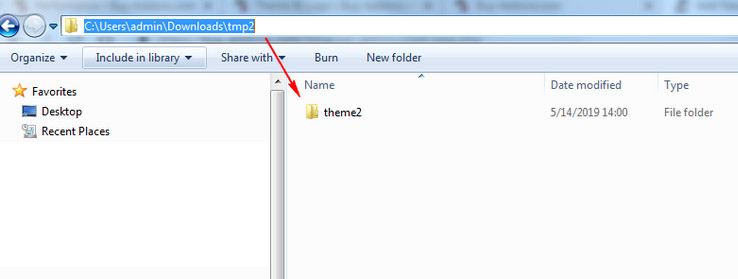
Step 2: Unzip your Prestashop theme into a directory in your computer, example: We unzip theme2.zip into “theme2” directory in local path: C:\Users\admin\Downloads\tmp2
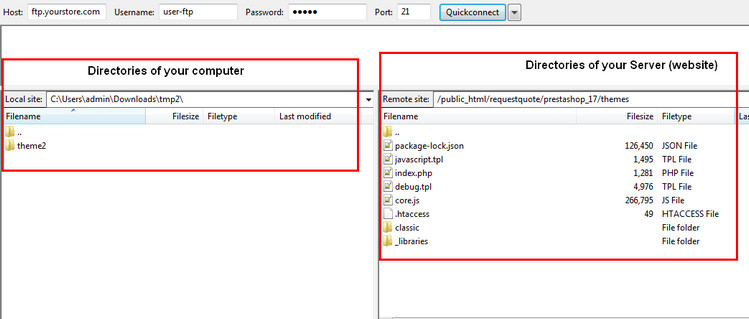
Step 3: Open FileZilla Software, enter your FTP account
- Host: Enter the address of your server for connect to it. example: ftp.yourstore.com or an IP of your server as 112.43.141.66
- Username: The username of your FTP account
- Password: The password of your FTP account
- Port: If you are using FTP account, enter 21. if your are using SFTP, enter 22
Then click Quick connect.
You can view it in FileZilla software:
- Left sidebar: list directories of your computer
- Right sidebar: list directories of your server that contains Prestashop’s source of website.
Step 4: Go to PRESTASHOP_ROOT/themes directory of your Server.
Then right-click to upload your prestashop module from your computer to PRESTASHOP_ROOT/themes directory.
Step 5: Go to Prestashop Backoffice > Preferences > Themes (in Prestashop 1.6) or Modules > Design > Theme & Logo (in Prestashop 1.7), choose a prestashop theme you want use and click Use this theme


![[Prestashop help] How to manual Install a PrestaShop module with FTP or Hosting account?](https://buy-addons.com/blog/wp-content/uploads/2019/05/install-with-ftp-4-120x120.jpg)
![[Prestashop theme] 9 Awesome Design Tips For Prestashop Product Page](https://buy-addons.com/blog/wp-content/uploads/2019/04/product-page-1-120x120.jpg)

![[Prestashop tips] Add a flag icon nearby language name in Prestashop Store](https://buy-addons.com/blog/wp-content/uploads/2019/01/01-120x120.png)

Leave a reply
You must be logged in to post a comment.